Cropped Closet Case Kalle Shirt

These pics were taken a couple days before we were inundated with rain from Hurricane Harvey. We’re alright here in Austin. It’s just been a nonstop downpour. I’m hunkered down indoors in the meantime with nothing much to do except sew or read or watch the news. And the news just keeps getting worse.
If you’re looking to help out the victims of the storm, please donate to a disaster relief agency or a local charity.

Back to sewing related topics: This is my second version of the Closet Case Patterns Kalle Shirt.
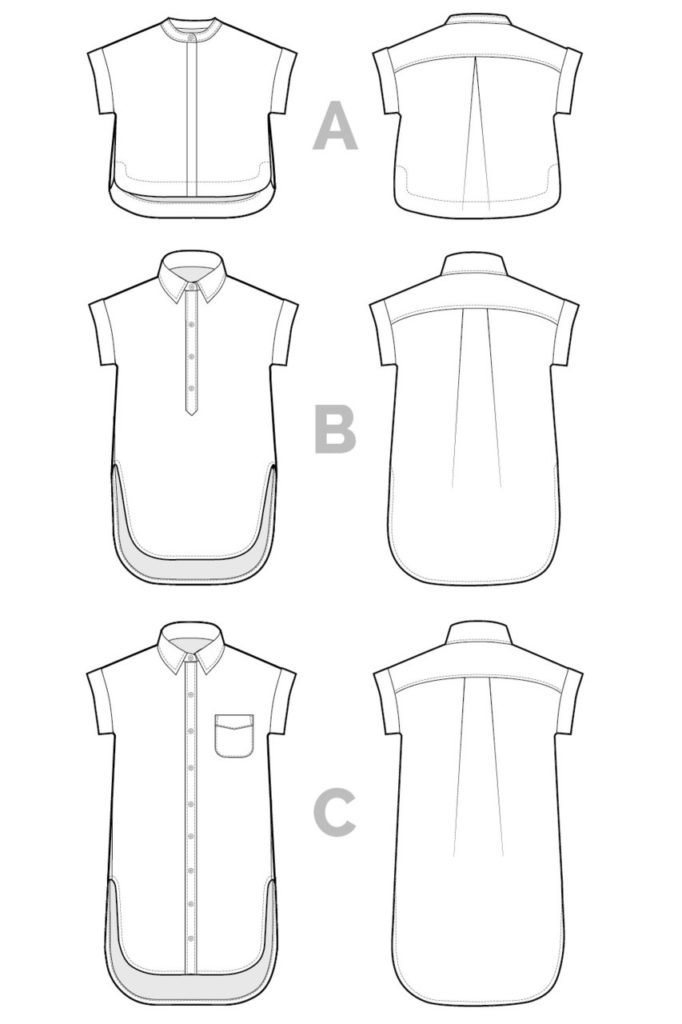
My first make was a shortened version of B with the popover style and regular collar. This time I made version A – cropped with a Mandarin collar, hidden button placket, and deep pleat in back.

I actually got this fabric from a store in Houston when I went this spring for a birthday trip. It’s a finely woven, cotton chambray (black and white) shirting. Unlike my first Kalle, this fabric is crisp and holds its shape well which accentuates the boxy shape (but also shows more wrinkles).

(hidden button placket)
The hidden buttons are some plain black plastic from my stash. The one visible button is a leftover patina-ed metal piece.

Usually, I wear this shirt with the collar unbuttoned. Next time I sew this pattern I’ll need to make adjustments to the neckline like lowering it in the front. This is probably a side effect of needing some kind of shoulder adjustment which is common.
As it is, if I button the collar it’s just a little too tight. I never noticed this in my last Kalle because I never button the collar on that version.

I didn’t make any fitting changes and because it was my second time making this pattern I finished it pretty quick. The hidden placket can seem a little daunting with all the folding but just follow the instructions and it’ll go smoothly.

The shirt is definitely cropped so if you don’t love that look I suggest sewing one of the other views in the pattern. As for me, my wardrobe pairings are a little limited. I have a few high-waist skirts I can wear with it, or these higher-waist jeans. This shirt may not be as versatile as my first version but since I like the fashion-forward style so much, I’ve made the effort to keep it in heavy rotation.

Could this be a new TNT pattern for me? I should try to sew the dress version next…

It looks great! Yes, sew the dress version next – I would love to see how it turns out x
Thanks Caroline! I’m putting it on my “to sew” list 😉
I love this cropped version on you! I think it looks just like it should 🙂 I made up this pattern a couple of months ago and it was a disaster sad to say. I tried to do a forward shoulder adjustment (which was complicated on this pattern) and an FBA – by the time I was done it was a mess and I ended up throwing the works into the bin 🙁 So…I’m thinking maybe just stick with the pattern as is as you’ve done and everything works out just fine!
Oh no! I’m sorry the pattern didn’t work out for you. 🙁 Could you elaborate on why the forward shoulder adjustment was complicated? Because I might need to attempt one next time…
Normally with a fsa you just lengthen the back shoulder and shorter the front and make the changes to the sleeve cap but because it’s all one in this pattern the sleeve ended up looking twisted for some reason. A lesson for me was to avoid patterns where there isn’t a distinctive shoulder seam and separate sleeve. 🙂 That was one of the problems. The other problem was with the FBA – again because the pattern was quite large I probably didn’t need to do an fba at all. It just wasn’t an easy pattern to do the adjustments I normally do 🙂
Ah, I see. Yeah looking at it now is imagine you’d have to draw a kind of angled shoulder line to allow for the point where the cuffs attach to not look twisted. And as for the FBA, I’ve done one on a kimono sleeve type bodice but I had to (how to describe this?) cut off the sleeve section and pretend like it wasn’t there to begin with, then do the FBA like normal, then “reattach” the “sleeve” section back on afterwards. Not perfect but it got the job done. I’m sorry the pattern was frustrating for you. I hate when that happens. 🙁 but thanks for sharing.
I love it! This is on the top of my to sew list, and specifically to be paired with high waisted skirts.
Thanks!
Got plenty of old shirts that needs upcycling exactly like this one. Thanks for sharing!
– Novie
http://naturallypretty.info