Silk Sari Turned Robe + Tutorial
A couple years ago Miss Lulu nicely gifted me half a vintage silk sari. That was about 3+ yards! What to do with such a lovely lightweight, semi-sheer silk? Why not make a robe?
This fabric was perfect for a robe as it’s so light that it easily catches the wind while you walk, making for a breezy, bohemian look.
This robe is super easy because it has cut on sleeves, minimizing the amount of sewing.
Because the silk is so fine I French seamed the two sleeve/side seams and hand rolled the hem all around the sleeves, hem and neckline. That was a lot of hand rolling! But the result is so nice.
My fabric was 50in wide and long that I was able to avoid having a shoulder seam. I simply folded the fabric at the shoulder, but this tutorial is going to assume you’ll need two layers of fabric and a shoulder seam.
Robe DIY Tutorial
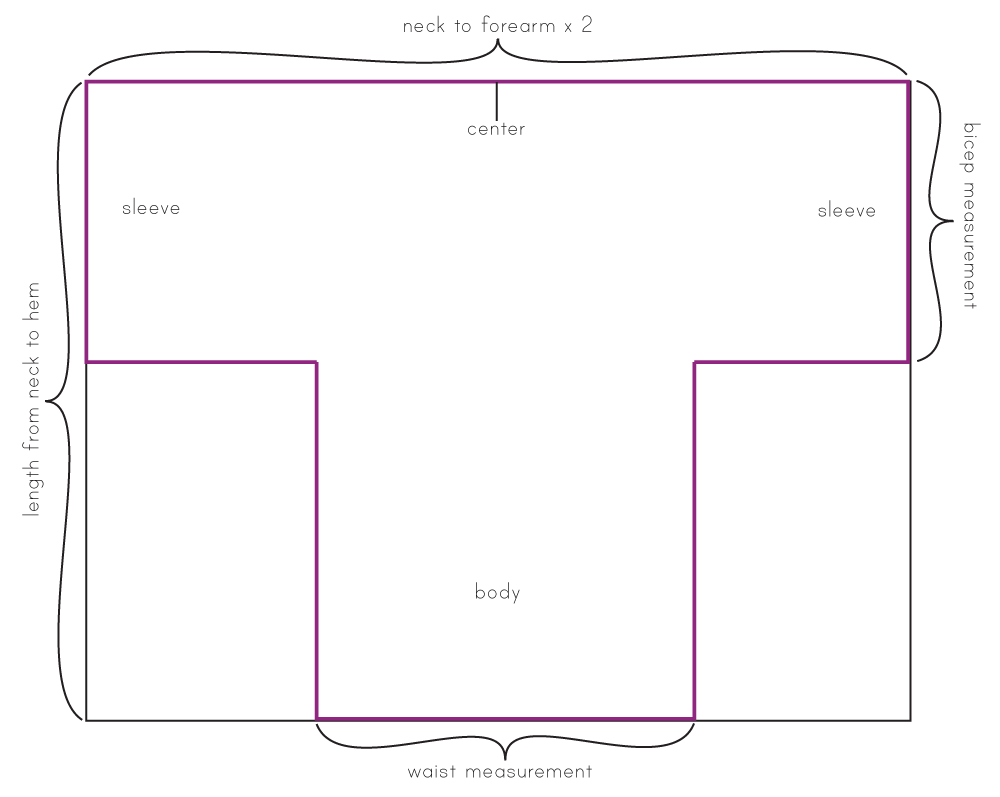
First, you’ll need to take some measurements.
1. Length from back of the neck to where you want your hem to be.
2. Length from back of the neck to about mid-forearm x 2.
3. Circumference on the widest part of your bicep.
4. Waist measurement.
Cut two rectangles the length of Measurement 1 and the width of Measurement 2.
On both fabric pieces, measure the body of the robe like the image below. Mark the center front/back.
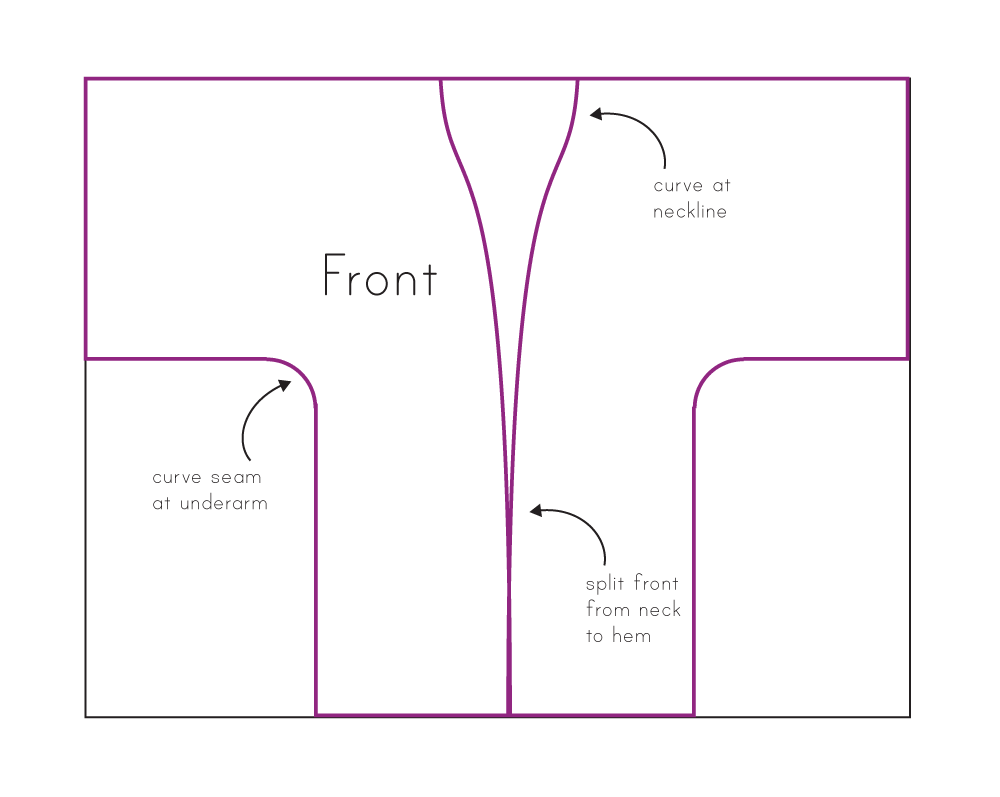
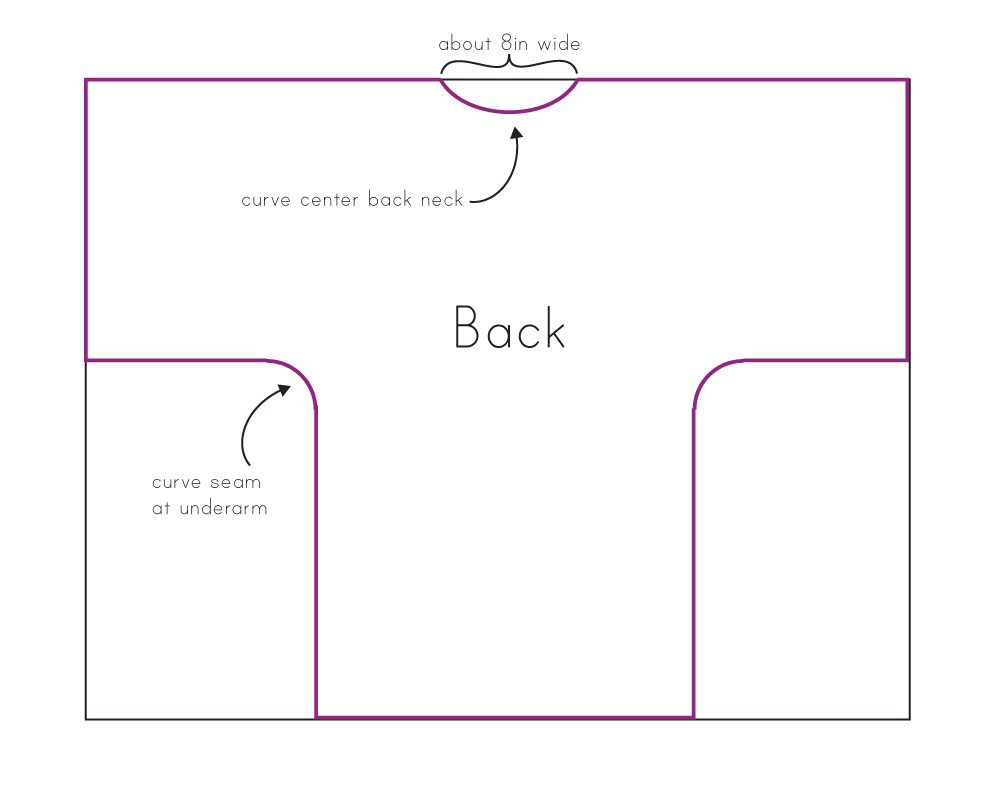
On both pieces, curve the underarm seams slightly.
On the back piece, curve the center back at the neckline about 8in wide.
On the front piece, draw a sloping line from the side of the neck to the center front at the hem.

Cut the fabric along the pink lines.
Right sides together, stitch the robe at the shoulder seams and the underarm/side seams. (If using a fine, lightweight fabric, consider using French seams.)
Hem the sleeves, bottom edge, neckline, and center front with a narrow hem/rolled hem.


Thanks! A cool little tutorial and it’s a great way of wearing some pretty fabric rather than it hiding in the stash x Your kimono looks lovely on you!
Thank you Caroline!
This looks gorgeous on you! Plus the tutorial is great, I will definitely be coming back to this to make myself one, so thank you!!!
Becky xo
PS. I just thought I should let you know, the link to Miss Lulu’s blog doesn’t work. It goes to here: http://dixiediy.com/2016/11/misslulusews.com
Thanks Becky! and I updated the link, thanks for the tip!
Thank you for this! I have a few of these Sari’s in my stash – I use them for lining fabric or if the silk is dense enough, a blouse but I never considered a nice kimono. Sometimes you just need a light wrap for some coverage in a breezy walk along the beach 🙂
Thanks, this fabric was super light – lighter than other saris that I’ve felt – so that made it good for this project. Saris would make amazing lining fabric for a coat… hmmm now you’re giving me ideas…
What gorgeous fabric! I absolutely love the soft colors and am glad you made something that puts the fabric front and center.
Thank you!!