Starting an Indie Pattern Company Pt. 3
Whoa, Part 2 of this series was a little wild, right? Lots of heavy hitting stuff on grading. Now, I think this part is more fun. We’ll be talking about the “packaging” and selling of the patterns.
If you’re just joining us be sure to check out Part 1 and Part 2.
If you are planning on making printed patterns rather than PDFs some of this info won’t apply to you, but that’s ok, other stuff will.
Since giving away my first patterns I’ve learned a lot about what needs to be included in a pattern you intend to share or sell. Some of these points seem obvious but in the beginning I didn’t always think to do all of these things (maybe I though “hey, it’s a free pattern, don’t complain!” not the best approach…).
What You Need to Include with you Pattern Pieces:
- Grainlines, center front and back markings if needed.
- All necessary darts, notches, gather points, pleat lines, buttonholes, zipper markings, arrows, etc.
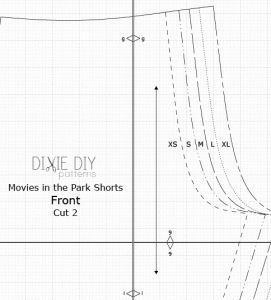
- Label every pattern piece with the company name, pattern name or number, pattern piece designation, and how many pieces to cut of what fabric. If you don’t include seam allowance elsewhere in your packaging or if a certain piece has a special seam allowance list it on the pattern piece. (I used to not include all of this in my very early patterns until I realized how easy it is for pattern pieces to get lost in my sewing room and it’s hard to match up pieces if I don’t know what pattern or company it belongs to!)
- Clear size markings. I like to make each size cutting line be a different dash pattern. Makes it easy to find your size on every piece.
- Extras, if needed, like lengthen/shorten lines or even finished measurements for pattern pieces.
What you need to include with your pattern packaging:
- A Size Chart for all your sizes, finished garment measurements are great, too
- Yardage needed in standard fabric widths
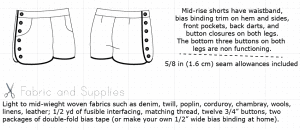
- Materials needed and recommended fabrics
- Seam and hem allowance
- A description of the design
- Line drawing of front and back
- Cutting layout
- Pattern piece inventory (I like to combine this with cutting/printing layout to save space)
- If you need to you can include a glossary of terms or symbols. I usually like to explain terms in the instructions to avoid needing a separate glossary.
- If you don’t have sample photographs in the pattern itself at least have them available to view where a customer buys the pattern like your blog or the site you use to sell patterns.
- Copyright and licensing info
Tips on how to write instructions:
- Go in a logical order. You can even divide instructions into sections like bodice, skirt, collar, etc.
- Be thorough, it’s good to remind users to finish their seams if you don’t tell them to do it from the beginning. It’s also nice to suggest techniques like understitching or how exactly to sew that baby hem. Try to think like a beginner, don’t assume a user knows what you’re talking about. It doesn’t hurt to tell people how to put in a zipper…
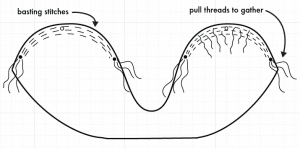
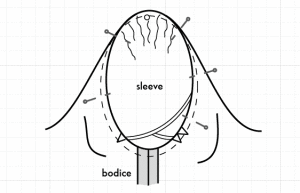
- Include clear illustrations or photos. Sometimes good pictures are better than any text instruction. I don’t think you need pictures for every step but it always helps!
- With illustration be sure to designate right and wrong side of fabric/pattern.
- If it helps you can have arrows pointing out specific parts of the illustrations.
- If you don’t know how to make good illustrations it helps reference other patterns, most companies have similar pictures for common techniques. Better yet, ask a friend who sews (don’t ask your boyfriend, he won’t know what a gathered sleeve cap looks like) to view at the image without the text and ask if she can figure out what the picture is.
- I make my instruction illustrations in Illustrator and just scale my pattern pieces down way smaller and use them to make graphics where I can.
- Your writing “voice” is up to you. You can be formal or casual so long as your instructions are clear.
Design and Layout:
Since I design for downloadable, print at home PDFs efficiency is important to me because I want to have the fewest number of pages as possible for the instructions and the pattern pieces. If you make pre-printed patterns this isn’t as much of an issue.
I lay all my pieces out on a template that is then divided into individual printer paper sizes. A 7″ by 9.5″ page template will fit on both A4 and letter size paper. Many home printers cannot print all the way to the edge. Some can’t even get close to the edge. Your pages must work with a variety of printers and standard paper sizes.
You also have to remind users to print with “no scaling” or 100% scaling. Some PDF readers like to “fill out” the whole page and blow the image up bigger. Bad!
Each of my template pages has a solid border and numbered and lettered notches so the whole grid can be matched up once it is printed out. Every pattern company is different, some have gridded pages, some have numbers in each corner. Just so long as each page connects logically in an order of assembly and the pages can be easily lined up on each side then you’re good to go. It’s a puzzle but you don’t want it to be a difficult puzzle.
I always include a 2″ or 4″ test square completely contained on one sheet of paper. If the test square spans multiple pages it defeats the purpose of being a good size reference! Sometimes home printers will want to print your PDF out in all different sizes. The test square allows users to make sure their pages are printing at 100% scale..
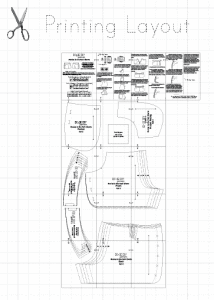
I also include a printing layout so users can make sure they’ve got all their pieces together and in the right order.
This is just a personal preference but I don’t like to have slivers or edges of pattern pieces printed on one page if I can avoid it. When you tape the skinny edge to the other pages it’s floppy and I think those tiny pieces can easily be lost or accidentally discarded when cutting.
I also like to have all my pattern piece labels contained on one sheet rather than spanning sheets. This isn’t always possible, though, but I try. Again, it’s just me being finicky about details.
I don’t like to have a lot of different colors in my PDFs. People like to save ink and I know I always print patterns in B&W. You should at least make sure it looks legible in black and white if you have many colors in your pattern or instructions.
Distribution:
Here’s a good question: one PDF document or two? Some companies have the instructions and pattern pieces in separate documents. I do it all in one because of how I sell my patterns. On Craftsy, last I checked, they can only support one PDF for patterns. Maybe you can do a zip file with two documents but I’m not sure. Burdastyle‘s free patterns only have one document upload and they ask you to add instructions directly to their website. I find that users get confused by that system so I include the instruction with the pieces.
The website I use for instant downloads through Big Cartel is called Pulley and they only accept one document per product.
I also sell on Etsy which now supports instant downloads.
Craftsy offers a free service for selling (or giving away for free) your patterns and Burdastyle is a good place to post free patterns. PatternReview.com has a few companies listed for download patterns for sale. I also sell on IndieSew.com. You could email them to see if you could be included.
Does anyone else know of a good place to buy or sell PDF patterns?
***Ok, well that’s about it. There’s obviously more details you can include in your pattern if you do choose but I think what I covered is the most important.
If I work my bum off I can make an average level pattern in about a month. But of course, I’m kind of lazy so it takes me a lot longer. The longest part is grading and creating all the packaging and instructions.
If you’ve got any questions or want more explanation on any part of this process leave me a comment or email me and I’ll try to get you an answer ASAP! Thanks for reading!
As a beginner sewer, I’m not thinking of making patterns anytime soon, but I wanted to let you know that I find this info super interesting! The first pattern I used when starting my sewing journey was your ballet dress pattern, and now that I have quite a few more patterns from various companies under my belt, I am VERY glad I started with your pattern. It was so clearly written, not only did I end up with a cute dress, but I was able to learn quite a few things about sewing and reading patterns at the same time. Its clear from this post that you put a lot of time into that process and I wanted to let you know how much I appreciate it. Thanks!!
wow megan! that’s like the nicest thing anyone’s said to me in a long time. thank you!!
What a great post. So thorough and resourceful. This one is being bookmarked!
thanks maddie! i know you’re working on patterns, too, and i’m really looking forward to seeing your work!
Thanks for reminding people that not every printer can print to the edge. I have an older but still very functional printer which has big non-printable areas. Mine especially can’t go closer than 1/2″ at the bottom so a lot of stuff can get cut off. A light grid is very helpful in lining things up because I can estimate what space is missing by squaring up the grid lines. Excellent set of posts, Dixie!
thank you louisa, yes, i also have an older printer and even some newer printers that aren’t meant for photo printing can’t print to the edge.
you’re right, grid lines are helpful, too!
Thanks for all the info. It’s very detailed and interesting for me. The whole behind the scenes is very intriguing to me
thanks! i’m glad you like it 🙂
Thanks Dixie. You are very generous to share your hard work in learning all this.
and you are very generous to share your lingerie patterns! 😉
Hello, Dixie! I hope you don’t mind a throw-back question to your bra making. (Thanks for the great list!) I was so delighted to read that one of the reasons you dove into bra making was to transfer what you leaned to making a supportive swimsuit. This is my whole reason for investigating bra making. My question is, were you ever able to transfer these skills? As you learned more about making a bra, did it seem less likely or more likely that you could combine swimsuit pattern with bra elements (underwire, specifically)?
Thanks!
Leu, sewing in NYC
hey Leu, yes, you can transfer what you learn from bra sewing to swim sewing. after summer was over I lost my swim suit sewing mojo but this year i’d like to try again. the main point you have to consider is that swim fabric is much stretchier than most tricots or simplex fabrics you’d use for bras. you can still use underwires but what I’d recommend is lining the cups (and if it’s a bikini top, maybe even the band) with this stuff called polylaminate foam. It’s a specialty item but you can buy it pretty thin and it helps to stabilize the swim fabric without adding too much bulk.
The easiest way to have a bra-like swim suit is to start with an underwired swim pattern (mccall’s makes one) or a bra pattern and adjust it to make it into a one piece or use it as a bikini top.
Sometimes I don’t check comments on older posts for awhile so if you’ve got more questions please feel free to email me! dixiedavis (at) gmail dot com.
I’m just jealous of your talent, I’, glad I found your blog!
__________________________________________________
Best wishes, @Tile Adhesive
Again, I’m so grateful to you for sharing this! Didn’t know your blog or patterns, but I’m about to buy those pretty shorts 🙂 Are you going to tell us something on how you determine prices? And maybe also a good idea for branding is that you ask other bloggers if they want to test your pattern. That way the word gets spread as well.
thanks lisa, you know with the prices i think that’s definitely something that varies with each person, how much time they put into the pattern and how complex the design is or how many variations are in the pattern. my prices are pretty low right now because i want them to be really accessible but the more patterns i release i’ll probably raise prices.
i think usually, though, pdf patterns tend to be cheaper than print because of less manufacturing costs but users also pay for the convenience of a pre-printed pattern.
THANK YOU for this series. I am going to start my own pattern company as well, and it’s so great to find helpful advice and support.
you’re welcome renata! and thanks so much for reading!
I want to start my own pattern company and found your articles realy helpfull. I would like to know how you decide the pricing of the individual patterns. Do you have a boo, link where there is more information about that topic?
Thank you!
Thank you so much for sharing all of this! These tutorials are incredibly helpful. I’ve been working toward creating a teensy tiny pattern company for months, and even though I’ve been thinking about it constantly, you’ve pointed out things here that hadn’t even crossed my mind. So much great advice!