Pocket Tutorial from Sewn Square One

Sewing Indie Month continues and today I have the pleasure of sharing with you Elizabeth’s (from Sewn Square One) tutorial on a cool alternative to plain patch pockets.


You could add these pockets to dresses, skirts, even pants or shorts (imagine these on some 30s style linen palazzo pants??).
What I love about Sewn Square One‘s designs are the little unexpected details like asymmetrical collars and decorative gathering in unexpected places.
So without further ado…
Pleated Patch Pocket Tutorial
Hello! First off, a big thank you to Dixie for the opportunity to post a tutorial on Dixie DIY! It’s exciting to speak to new readers and I hope that you enjoy this pleated patch pocket tutorial with printable pattern. Patch pockets are a great way to add a point of interest or a pop of color to a garment! –Elizabeth
Sewn Square One Patterns at www.sewnsquareone.com
Let’s Begin.
1. Choose a fabric that complements the garment that you will be adding pockets to. You will need at least ¼ of a yard.
2. Print and cut out the PDF Pocket and Pocket Facing patterns (it’s only 2 pages). Make sure to print at 100% scale. Use the 1” x 1” print test box to check that the pattern has printed at the correct size. The patterns will print on 2 pages and will need to be taped together before being cut out.
3. Pre-treat your fabric and iron out wrinkles.
4. Gather your sewing supplies.
Sewing Supplies Needed:
-pocket and pocket facing patterns
-fabric
-coordinating thread
-iron and ironing board
-fabric scissors
-pins
-water-soluble pen (optional)
-point turner, or blunt, pointed tool
-sewing machine
Step 1: Cut Out
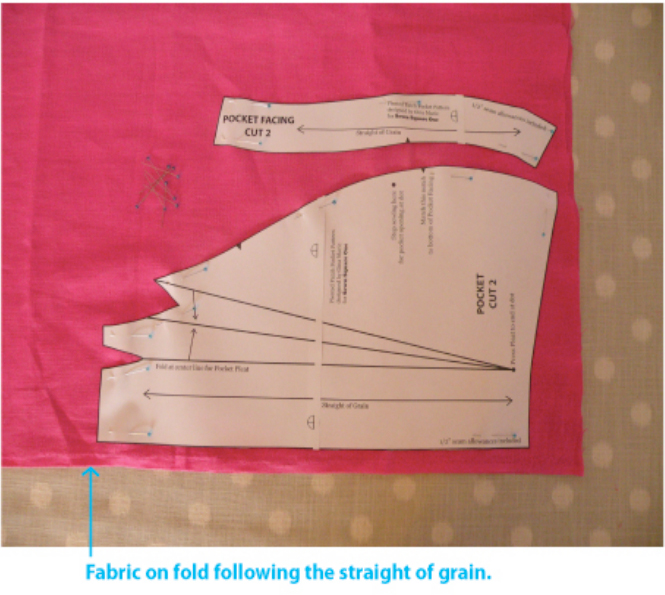
Pin your pocket and pocket facing patterns to your fabric (matching the “Straight of Grain” to the fabric’s grain) and cut out 2 of each.
Step 2: Mark Pieces

While the patterns are still pinned to the fabric make small snips at the top edge of the pockets where the tuck lines meet the edge. At this time mark your notches with small snips where indicated. Mark the bottom of the pleat (there is a dot marking this point on the pattern) with a water-soluble pen or a pin. Additionally, mark the dot that indicates where to stop sewing for the pocket opening.
Step 3: Prepare Pleats
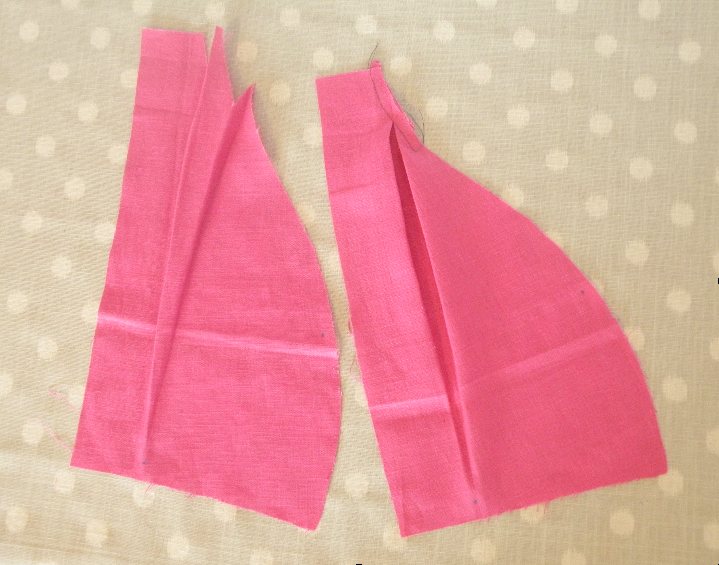
1st Tuck Preparation:
Pinch a tuck in the top edge of the pocket where one of the lines comes to the point, fold that tuck all the way to the bottom point and press in the tuck, stopping where it disappears at the bottom point. Fold the tuck to where it meets the middle snip marking the “fold to” line. Pin this tuck in at the top.
2nd Tuck Preparation:
Pinch in another tuck where the line comes to the bottom of the “V”. Press the fold to the bottom point. Fold it to meet the other tuck. Press this tuck to where it disappears at the bottom point. Pin at the top.
Once you have the tucks pressed in place run a line of stitching across the top of the pleats just inside the seam line to hold them in place.
Step 4: Attach Facings

Pin the pocket facing to the top, squared corner of the pocket top and the curved edge it turns into, matching notches.
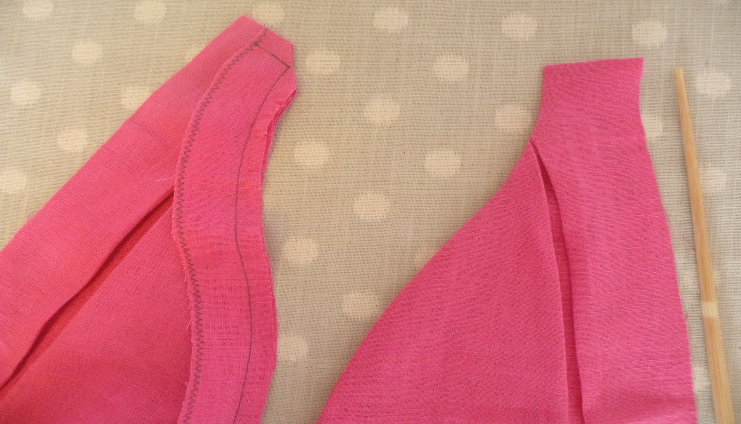
Sew the facing to the pocket edge, pivoting at the corner. Trim the corner, clip the curved seam, and turn the pocket facing to the inside of the pocket. Push corner out with a point turner. Press.
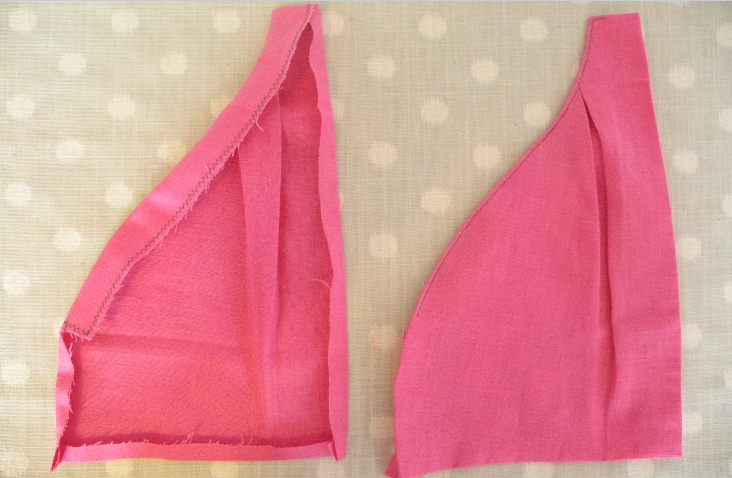
Press the rest of the seam allowances under ½”, and the rest of the way around the pocket.
Topstitch close to the pocket opening.
Step 5: Topstitch to Garment
Position the pockets on the garment. Pin and then topstitch close to the pocket edge. Start stitching at the mark where the pocket opening ends and stitch around the pocket until you come to the top corner at the beginning of the pocket opening. This stitch line will slightly overlap with your previous topstitching.
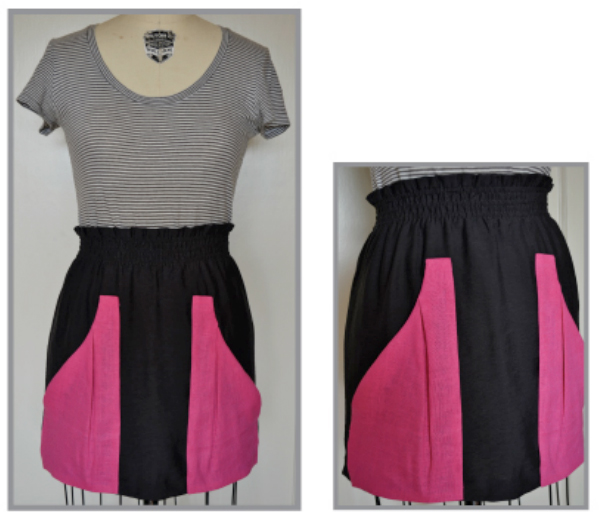
Voila—you’ve added pleated patch pockets to your garment! I hope that you have enjoyed this tutorial and thank you again Dixie!

Great Idea, thank you – I love the pink on black too!