Raglan Top to Dress Tutorial
So I made this knit dress that I posted earlier this month from a basic raglan top pattern. A couple people asked if I’d make a pattern for it but since it’s just an altered pattern I thought I’d show you how to do it yourself.
If you’ve never done any pattern alteration more than just for fitting you’ll find that it’s a pretty simple idea.
I used the raglan sleeve pattern from Wendy Mulin’s Sew U Home Stretch book. You can use any plain raglan sleeve pattern for knits. The pattern in the book comes with front, back, sleeve, collar, cuff, and hood pieces so if you want you could make a hoodie. I left out all but the front, back and sleeve pieces.
I like raglan sleeves because you don’t need to do much, if any, fitting at the shoulders. So if you have really sloped or broad shoulders, etc, you’ll find this style easy to sew and wear.
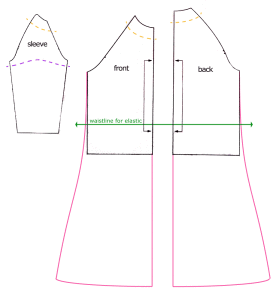
I cut the neckline to fit the crochet applique but if you’re leaving that out you can adjust your neckline any way you want. I just widened the original crew neck style by about an inch or two by lowering the neck on all the pieces (orange line).
Next I shortened the sleeves by several inches. In the end my sleeves curved up a little at the center (purple line).
To make it a dress I measured how long I wanted the dress + seam allowances. I extended the side seams of Front and Back and gradually angled it out to an A-shape making sure I had enough ease around the hips (pink line).
Finally I copied the waistline markings that were already on the original pattern so I could add my elastic waist (green line). If your pattern doesn’t have a designated waistline you can measure on your body from under your armpit to your waist then transfer that measurement to the side of your front and back pieces from the bottom of the armhole.
Then just sew everything up as normal!
Just hem the sleeves and bottom. You’ll have to create a new collar or binding because your neckline is now bigger. Measure your new neckline and cut a strip of fabric about 2/3-3/4 as long as the measurement and attach as normal.
For the waist you can stitch the elastic directly to the inside of the dress or I cut a strip of fabric as a casing and sewed it inside and inserted the elastic.
There you have it! Not so difficult to alter a pattern like that, right? Now go forth and sew!


Omg, thank-you so much for posting this tutorial. That dress is so friggin’ cute.
I bought some crochet applique right after you posted, but it’s for a racerback top or dress. I can’t wait to get to it.
Great tutorial Dixie! Your dress is lovely. I want to do a dress with the applique in it. It’s so charming! I’ve never altered a pattern more than changing a neck line or lengthening it. I may just start though….